Tuesday, April 24, 2018

BBQ Boneless Wings

Hello all!
We hope you have been enjoying our videos.  We have wanted to make some Boneless Wings for a while now.  These are oven baked and came out with a nice flavor.  They weren't exactly like something from the store or a restaurant but we are working on that.  These however don't require a fryer and are simple to make!  Boneless wings are such a treat and everyone loves them!  We think you will enjoy this post so keep reading for all the details below.

Serves: 6-8
Prep Time: 8-10 Minutes
Cook Time: 25 Minutes

Ingredients:
Chicken Tenderloins 1 Package of 8-10 4 Cups Italian Seasoning 1 Table Spoon Smoked Paprika 1 Table Spoon Garlic Powder Pinch of Salt Pinch of Pepper 2 Table Spoons Grated Parm Cheese. 1 Container BBQ Sauce

Directions:
Using fresh Chicken Tenderloins/Breast make sure they are washed and dried. 
Cut them into small pieces about 1/4 inch pieces. Place in a side bowl
In a large bowl mix the Italian Seasoning, smoked Paprika, Garlic Powder, Salt, Pepper and Parm Cheese. Mix well.
Add a BBQ sauce to the cut chicken bowl and mix well.
Place a piece of chicken coated in the BBQ Sauce in the bread crumb mix and coat.
Place on a cooking sheet tray. Do this with all the pieces.
Set oven to 375 Degrees F. Let Cook for  15 MInutes
Take out and coat with BBQ Sauce.
Set the oven to broil and put the wings back in for 5 minutes
Take the tray out and flip the wings over and coat the other side with BBQ sauce.
Put back in the over for 5 minutes still on broil.
Remove and serve up.

Here they are!

They came out really well and next time maybe we will try them a different way.  We like to oven cook as well as fry different foods and always like to try new things.  We do hope you try this out and think you will enjoy it.  Try new sauces even!  Below is the video on how to make them so we hope you do check it out.


Thank you all again for hanging out with us today and checking out this post.  We hope you all enjoyed the video and try.  Thanks for checking out our site and channel, be sure to see other videos to make other great food dishes!

Thank you and remember,
Cooking should be FUN, have FUN doing it!

The Cooking Corner
~Blog Team

Saturday, April 14, 2018

Hardy Hash

Hello all!
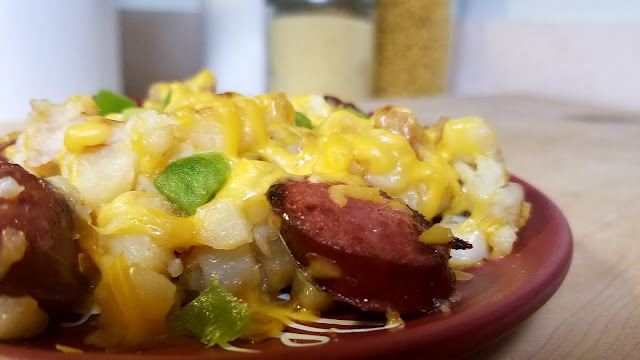
     Looking for a very filling and tasty breakfast!  Check out this creation.  Our Hardy Hash mix is one we think you really will enjoy!  We can't help but feel people just don't know what to make for breakfast anymore.  This dish is not only easy and tasteful but you can change it up how ever you wish!  Want to add something we didn't.  Do it!  Want to subtract or substitute something?  Be our guest!  This breakfast is very simple to make your own and that's why we loved it!  Check it out below to see how simple it is. 

Prep Time: 5 Minutes
Cook Time 35 Mintues
Total Time: 40 Minutes

Ingredients: 4 Cups Hash Browns (Frozen Store bought work great) 1/4 Cup Chopped Green Pepper 1/4 Cup Chopped Onion. (We forgot to add) 1/3 Cup Oil 1/4 Pound Smocked Sausage cut into 1/4 inch slices. 1/2 Cup Shredded Sharp Cheddar Cheese

Directions:
In a cast Iron Skillet or oven skillet heat up your oil.
Once the oil is hot add the has browns. Tip You can buy these with Onions and Peppers included)
Let the hash brows heat up for several minutes until you can lift them up and see a golden brown.
Once golden, flip them and get the other side.
After several more minutes add in the chopped Onions and Pepper (If your hash brows didn't come with them.)
Now stir and let them get golden brown all over.
While they are cooking, heat up a separate pan and add just a touch of oil.
Cut up the Sausage into small slices, 1/4 inch think pieces.
Sear them in the separate pan on each side.
Add them to the hash when both sides are nice and seared.
Give everything a few good stirs.
Remove from the stove and lay with shredded sharp cheddar cheese.
Put the lid back on for a few minutes or until the cheese is melted.
Serve up!

Look at this!

Please make sure you check out the video below to see how we made this. 


Thanks again everyone for checking out this post and we do hope you watched the video.  This breakfast was simple to make and think you will enjoy it!  Be sure to put any different ingredients you want in this to make it unique!  Thanks for all the amazing support everyone.

The Cooking Corner
~Blog Team

Monday, April 9, 2018

Oven Baked Ribs | Fall off the Bone Ribs

Hey all!

     Do we have a post for you!  With it being cold outside still why not heat that oven up and make some of the best fall off the bone ribs your family and friends will try!  This might be one of the simplest larger dishes we have made.  With only a few key ingredients too!  We think you really will enjoy this dish.  Ribs are one of Chef's favorite dishes and this fall off the bone recipe he has been making for years now.  The team absolutely loves them and usually the table is full when Chef announces he is making them.  Fall off the bone ribs are usually a hit because of how tender they are.  Smoked or grilled ribs are always a summer classic.  However some people don't like the struggle of the toughness.

     Fall off the bone ribs usually gain popularity with the crowd that doesn't want to fight for the meat to come off.  However Chef loves how simple this dish is to make and how beautiful it comes out.  Please check out all the information below and give them a try!

Prep Time:  30 Minutes
Cook Time: 2 Hours 40 Minutes
Total Time: 3 Hours 10 Minutes

Serves about 6

Ingredients: 1 Rack Center Cut Ribs
AP Rub-Salt, Pepper, Garlic Powder Rib Rub- You can make or buy. (Chef Buys, its easier) 1 Lemon BBQ Sauce-You can make our buy. (Again Chef Buys)

Directions:
Heat Oven to 300 Degrees
Make sure you purchase fresh Pork Center Cut ribs. (However other cuts or even beef will work)
Take off the membrane on the back of the ribs. (This will make them even more tender)
Sprinkle some AP rub on each side of the rack and let sit for about 30 minutes.
Cut the ribs up individually.
Cut a lemon and squeeze the juice over the ribs then rub the juice around. (This tenderizes them)
Coat each rib fully in your choice of Rib Rub. Get all the sides.
Place the ribs individuality meat side down in a tinfoil oven save pan.
Continue till done.
Place tinfoil over the top. (Shiny side up)
Place the pan in the oven and let cook for 2 1/2 hours.
Take them out and remove the tinfoil.
Drain any of the fat that is now pooled in the pan.
Turn your oven to Broil.
Brush your favorite BBQ sauce on the ribs.
Place in your oven for about 5 minutes.
Rove and flip over, then brush with BBQ sauce again.
Place back in for 5 more minutes.

Remove and plate!


     This dish really is so simple and your guest will wonder how you pulled it off!  One of Chef's favorite things about it is the fact that it looks difficult but is so simple!  We know there are so many oven backed rib recipes out there but we do hope you try outs.  Please also see the video below to fully understand how we made this and to possible answer any questions you may have!

  
    Thank you again for checking out our site and do hope you watched our video.  Again this is such an easy dish to make we hope you do try it!  Please note the picture above was the our dish!  It was not copied, stolen or photo shopped in any way!  Thank you again, be sure to check our site for other fun and easy cooking ideas!

Remember,
Cooking should be FUN!  Have FUN doing it!

The Cooking Corner
~Blog Team