Wednesday, October 31, 2018

Sweet and Spicy Meatballs | Happy Halloween

Hey all! Happy Halloween! We always love putting an app out before Halloween. This one would be great for that festive party! In fact it would be good all year. We know there are many meatball recipes out there but this one is so simple and we really think you will love it! We always try to have a fun dish for the holidays. We also always try to put out a fun appetizer. People love to throw parties and always wonder what to put out. This dish is so simple and has a great taste! Not only will this be great for your Halloween party but other ones too!

Serves: A good sized group

Prep Time: 5 Minutes
Cook Time: 35 Minutes
Total Time: 40 Minutes

Ingredients:
2 Lbs Meatballs. (We suggest store bough, they are made and already cooked.) 1 Cup Packed Brown sugar 1 Cup Red Wine Vinegar 1 Cup Ketchup 1 Tablespoon Soy Sauce 1 Teaspoon Ground Ginger

Directions:
Cook the meatballs to the directions on the package. Typically around 350-425 degrees for about 20-25 minutes. (They are usually precooked so only need heating.)
With about 10 minutes left on the meatballs start the glaze.
Heat up a pot and add the ingredients. Brown Sugar, Wine Vinegar, Ketchup, Soy Sauce, Grown Ginger.
Bring this up to a boil.
Once boiling reduce heat to low or off and let simmer.
Let the glaze simmer for about 10 or so minutes it will thicken up.
When the meatballs are done take them out and place them in a large bowl.
When you feel the glaze is thickened up drizzle some over the meatballs.
Then toss to coat making sure they are all coated nicely.
Serve up on a platter!

Here they are!

We think this is such a great party appetizer because it is so simple and easy. Also however they are so good! Going to a party or hosting can make you wonder what to bring or make. We think this makes such a great dish because lot of people love them and they will wonder how you made them. Be sure to check out the video below to see how we made this!


Thank you so much again for joining us on this spooky holiday!  We do hope everyone enjoyed this months fun recipes and do check other ones out!  This time of year is one of our favorites we just love making fun dishes for everyone to try out.  Thank you for joining us and hope everyone has a great, fun, safe and spooky Halloween!

Remember,
Cooking should be FUN, have FUN doing it!

The Cooking Corner
~Blog Team  


Wednesday, October 24, 2018

French Onion Soup

Hello all! Our 100th Cooking Video is here! We wanted to celebrate by showing you an amazing classic. French Onion Soup. This dish is so simple you wouldn't believe! I feel a lot of people out there that cook or may not might be nervous about this dish. It is a lot simpler than most believe and Chef has now made this a few times. We are using Byron Talbott's recipe, with a few twist to it. We have been watching him for a while now and even used some of his video tips and tricks in our own videos. Chef admires his work and was excited to make this. We did change a few things from his video that we will talk about below but for the most part try this out. Your guest won't believe the awesome job you did! Byron if you stopped by thank you for all the great work you do! His links will be listed below.

Serves: 4
Prep Time: 5 Minutes
Cook Time: 1.5 Hour
Total Time: Little over about 1.5 hours. Minutes (however you can lower the cook time, we'' explain below)

Ingredients: 2-3 medium yellow onions
3-4 Tablespoons Butter
2 Tablespoons Butter 5-6 cups beef stock 1/2 cup White or Red wine (optional) 1 sprig of thyme 1 whole bay leaf 1 tbsp sherry vinegar Provolone Cheese Garlic Tuscan Bread (Whatever bread you like) Salt & Pepper to taste
Directions: Prep the onions by cutting them. You want to cut them in half, then with the onion. It will look like a rainbow when cutting. Make sure to cut both ends off first. This cutting style will allow the onions to cook better.
Heat up a medium saucepan and add the butter and onions.
Cook on medium to high heat for about 20-30 minutes.
Keep stirring the onions around as they become more golden brown. You want to stir a lot.
About half way add about 2 tablespoons of water to break up the sediment on the bottom.
Stir again to clean the bottom of your pot. This is very important, it adds flavor.
When the onions have a deep brown color you can move forward.
Add the Beef Stock. (You can use Chicken or Vegetable Stock. Also note Broth as well.)
Add the wine. (We use White but you can use Red.)
Add Sprig of Thyme and one bay leaf.
Add the Sherry Vinegar.
Add Salt and Pepper.
Stir well then let cook. You can put the lid on to help move it along just monitor it.
Once the soup is getting close get your bread ready.
You can use any bread you like just cut it to fit the crocks and add some oil, salt and pepper then put in the over for about 15 minutes at 375 degrees.
Remove and if the soup is ready fill the crocks with soup, but not all the way. Leave room for the bread and cheese.
Put a piece of bread in the soup and then add 1 or 2 pieces of cheese. We use provolone.
Put the crocks on a cooking sheet and place in the oven at 400 degrees for about 15 minutes.
The cheese will have a golden brown color and melted.
Remove and let cool a few minutes.

Here it is!


We understand the directions above look long but do not be afraid they are just detailed. The best thing we can advise is check out the video below. Chef shows you how to really make this so simple! Cooking the onions will take about 20-30 minutes however after you add the stock and wine and other ingredients you can really let those cook for anywhere from 20-40 minutes. This however is up to you the longer it cooks it will cook down and to keep that in mind but Chef says he likes it to cook and simmer a long time for full flavor.

*Please note if you are wondering to use Stock or Broth. Stock is prepared slower and usually the parts of the animal are cooked down in it. The flavor is more intense. Broth is a bit lighter and can be served alone. You can heat up broth if you are sick to drink, but not usually stock. We want to point out we did use both at different times. Beef Stock and Beef Broth. We feel the flavor wasn't to different however it would really only work if you cooked two crocks and taste tested them side by side. However we advise to just try them out and whatever you may like better use. Either will work and don't over think what one!

Be sure to check out the video below to really see how we put this together!

Thank you again for joining us on this post and we do hope you check out this video.  This dish is not to be overthought so don't.  After the fluids are added to the onions don't worry to much about time.  Some people do and we tell them not to.  Have fun with this dish, it is simple and a lot of people love it!  We want to thank Byron again for just all he has done.

Byron Talbott has a cooking channel and a few years ago Chef looked over how he makes his videos to really get some good ideas.  We know he likes how they are put together and he admires his work.  Below are his links, check them out.  Byron if you for any ready see this video/post thank you so very much!  We are big fans.

We hope everyone is having a fun Halloween season so far and cooking up some great festive foods!

Byron's Links:
Site:


French Onion Soup:


Remember,
Cooking should be FUN, have FUN doing it!

The Cooking Corner
~Blog Team 

Thursday, October 18, 2018

Mussels Marinara

Hey all!
Need some Mussels!? We got you covered, this is such a fun and easy appetizer. Mussels are pretty cheep and the other ingredients are as well. This meal can be put together in about 10 minutes too! This dish was one of our absolute easiest to make that involved the stove-top. Check out below for all the ingredients. This dish will make a great appetizer you can make it a meal however this video was intended for an app. Mussels are very flavorful and a lot cheaper than clams so this dish won't run you that much. Check out below on how to put this great dish together!
Serves: 6-8
Prep Time: 5 Minutes
Cook Time: 15 Minutes
Total Time: 20 Minutes
Ingredients: 2 Lbs Fresh Mussels 1 24 oz can crushed tomatoes 1/2 Chopped Onion 3 Cloves Garlic, Minced 1/2 Cup White Wine
2 Tablespoons chopped fresh Basil Pinch Black Pepper
2 Tablespoon Olive Oil

Directions:
Heat up a deeper sized pot and place the oil, onions, and garlic inside to start cooking.
After several minutes and the onions are starting to carmalize add the mussels.
*Make sure all the mussels you add are fresh, rinced off and fully shut. Discard any that are open before you cook them.
Next add the crushed tomatoes, wine and chopped basil, and the pinch of black pepper.
Cover the lid and let simmer for several minutes letting the muscles cook and open.
This won't take long mussels will steam fast!
Remove the lid and start to plate these up!
You can garnish with some fresh parsley

Here is our end result

The end result was amazing. They had a great taste and not to fishy as one might think. The wine and marinara helps blend all the flavors. Taking the mussels out of their shells is not hard at all but you will want a separate bowl for them. Below is how we put this together so be sure to check it out, this dish didn't take long at all!


We do hope you enjoyed the video and make sure to try this out.  It was a fun fall app and every bit was eaten.  One of our favorite things was this dish was not expensive at all and it took no time to do!  Two things everyone loves right!  We also think this is a fun fall dish to have to as it gets cooler out.  Thank you again for taking your time to join us today and we hope you enjoyed this post and will try it out.  

Remember.

Cooking should be FUN, have FUN doing it!

The Cooking Corner
~Blog Team

Thursday, October 11, 2018

How to make Sour Cream Pie

Hey all! October is here! We love this time of year! Halloween fun! This was a request from a view and we wanted to say thank you for the submission. Well we did some homework and here it is. Sour Cream Pie! We were a bit nervous at first but it actually came out really good. A bit on the tart side but not bad, plus it was so simple to make! Give this one a try. We will admit it was surprisingly tasty. A nice tart flavor with a sweetness to it. The team was nervous because well sour cream isn't exactly in most pies! However you gotta at least try it, and this was sent to us with a comment so we had an idea that it was something out there.

Serves: 8
Prep Time: 5 Minutes
Cook Time: 1 Hour + Few hours-Overnight to cool
Total Time: 4 Hours

Ingredients: 2 Cups Sour Cream 5 Tablespoons Sugar 4 Eggs 1 Gram cracker Pie Crust
1 Pint Raspberries
1 Can Whipped Cream
Directions:
Preheat oven to 300 degrees
In a large bowl mix the sour cream, sugar, eggs and any other ingredients you wish. We did Raspberries but you can leave it plain or do blueberries or other fun ideas!
Mix well, make sure the mash the raspberries in well if you use them.
Pour in a pie crust.
Bake for 1 Hr
Take out and let cook in your fridge for a few hours up to over night.
Cut into pieces
Decorate with whipped cream and other toppings you have/used.
Serve up cold

Here it is!

Again, this sounds really different or even crazy but the eggs, sugar and berries mixed with the sour cream make it really tasty. Baking them all makes this great tart flavor and then the sweetness of the whipped cream is such a unique flavor! This might be one of our cheapest videos yet or up there. See below how we put this all together.


We hope you did like our video and do try this.  It was something we were nervous about making but after doing it and trying it.  Well it was great!  Something to learn from all this, sometimes you have to just step outside your comfort zone, try something new!  It also shows how some ingredients just really mix well and come together after baking.  Thank you again for checking our post out and we hope you read others we have.  Have a great Halloween season this year!  Stay Spooky!

Cooking should be FUN, have FUN doing it!
The Cooking Corner
~Blog Team

Wednesday, October 3, 2018

Inside out Lasanga

Hey all! Fan of Lasagna? How about a fast, simple and amazing dinner! This dish was so simple to make and tasted amazing! This would be perfect for that fast, rush during the week when everyone is busy! We really enjoyed this meal not only because it was delicious but it was so simple to make! This really is a great fall dish you can put together in a pinch for the family! Chef also used some healthier ingredients in the mix to make things healthier. Make sure to check out how we put this all together!

Fun fact about Chef, he had never made the tradition Lasagna before! He admits to it too. He just laughs saying it feels it is something he never learned. However this is so different this dish allows you just have fun and mix the ingredients all around! No fumbling with the long pasta noodles or worrying about layering. This mixed up dish is a newer take on a classic meal. Check out how we put this together below we think you really will enjoy it.

Serves: 6-8
Prep Time: 15 Minutes
Cook Time: 15 Minutes
Total Time: 30 Minutes

Ingredients: 1 Pound Ground Beef 1/2 Sweet Onion, Chopped 1 Teaspoon Minced Garlic 2 Cups Spiral Macaroni 1 Cup Cottage Cheese 8 Ounces Red Sauce 1-2 Cups Shredded Mozzarella Cheese 1/2 Cup Shredded Parm Cheese, plus some for garnish Parsley for garnish Bread, for the side

Directions:
Preheat the oven to 350 degrees
In a medium pan, cook the ground beef. (Chef uses 90/10 fat ratio If you use something with more fat like 80/20 you won't need to heat a little oil. However chef used a touch of oil.
After several minutes add the chopped onion let cook
As the beef is almost brown and cooked add the garlic, finish cooking and turn the burner off.
Start your water and get your pasta almost cooked, you want the pasta al dente becuase the dish goes in the oven.
Now add the cortege cheese to the cooked beef and onions, mix well.
Add red sauce to the meat mixture and again stir
Add the pasta and stir well
Spray a baking pan with a non stick solution. You want an oven save dish like we used.
Put the mixture in the dish and spread out evenly.
Place the shredded mozzarella over top
Place the shredded Parm Cheese on top as well.
Sprinkle some Parsley then place in the oven.
Cook for about 15 minutes.
The cheese will have a nice melted top.
Dish up and serve with some buttered bread and more parm cheese on top.

Here it is!


This came out so well! It has a great look to it and is so delicious! It was very filling but doesn't make you feel like you ate something unhealthy. This again is such a great weekday meal if you need something for the family. Be sure to check out the video below to see how we put it together! The video below is very simple to follow and chef lays everything out. He also said this dish is not expensive at all and the left overs are just as good!


Thank you again for checking it out.  We do hope you enjoyed this post.  This meal is really one to have in your cookbook!  We think the family will not only love it but ask you to make it often.  Be sure to check out our other videos and thanks again for taking the time to join us for this post!  

Remember,
Cooking should be FUN, have FUN doing it!

The Cooking Corner
~Blog Team 


Friday, September 28, 2018

Buffalo Chicken Enchiladas

Hey all!  Love Enchiladas?  How about trying a Buffalo Chicken one!  This dish is so full of flavor and is so simple to make!  We think you will love it!  Below are all the ingredients and feel free to adjust them.  This meal didn't take long at all to make either, yet another very simple one.  Chef's wife was pregnant at the time of this video so there are some tips and trips to it because you are working with Blue Cheese and have to be careful. 

However this is one of our more favorite dishes because not only taste, but how simple it is!  This is one of the great 30 minute meals you can put together before the family is home!  Have it ready to serve as they arrive!  Chef has told us these are the kinds of dishes he loves most.  He knows how difficult it is to work and get things done when you arrive home.  We do hope you check out this dish below we think you really will enjoy it!

Serves: 5
Prep Time: 10 Minutes
Cook Time: 15-20 Minutes
Total Time: About 30 Minutes

Ingredients:
6 Table Spoons Melted Unsalted Butter, split into 3 tablespoons.
4 Cups of Shredded Rotisserie Chicken
8 Ounces Soften Cream Cheese
2 Cups Shredded Cheddar Cheese, Split in two.
1 Cup of Hot Sauce.  Split into 1/3 and 2/3.
Bundle of Scallions, cut into small pieces.  White parts and green.
1/4 Teaspoon Cumin
3 Tablespoons Water
Tortillas
Non Stick Cooking Spray
Crumbled Blue Cheese
Blue Cheese Dressing
Sour Cream

Directions:
Prep Oven to 400 Degrees
Take your precooked rotisserie chicken and pull it apart.  White meat only is fine.
Place the Shredded chicken in a large bowl.
Add softened cream cheese, 1 cup Shredded Cheese, 1/3 Hot sauce, Chopped white part of the scallions, 3 tablespoons melted butter, and the Cumin
Mix all the ingredients well.
Glaze:  In a small side bowl add 2/3 cup hot sauce, 3 tablespoons melted butter, and 3 tablespoons water.
Mix well.
Spray your oven save cooking dish with a non stick cooking spray.
Place a Tortilla down and put a little filling in the middle and roll up then fold ends up.
Place the rolled tortilla in the dish and continue on till the pan is full.
Drizzle the glaze mixture over all the rolled tortillas.
Sprinkle the rest of the shredded cheese on top.
Sprinkle some crumbly blue cheese over the top.
Place in the oven for about 15-20 minutes at 400 degrees.
Remove when the top looks melted.
Drizzle some blue cheese dressing over any of the tortillas you want, leave some non covered if you wish or if someone is pregnant. 
(Note the crumbled blue cheese is cooked so it is safe.)
Sprinkle some of the cute green scallions over top and then serve up with some sour cream!

Here is is!

There seems like a lot of steps but if you watch the video below you will notice it is very simple.  You do a little bit of mixing, topping, them baking!  They really came out good, a little heat but that blue cheese also makes them taste like buffalo chicken.  Almost like our buffalo chicken dip all wrapped up and hand held!  We do hope you check out the video below, this dish is so super simple and you can totally surprise the family with it!


There you have it!  Very simple but fun, we think you and your family will enjoy it.  Give it a try, why not right it takes less than 30 minutes!  We do hope you enjoyed this post and others like it we have been putting out.  Check out our other dishes and be sure to stay tuned for more to come! 

Thank you again for joining us!

Remember,
Cooking should be FUN, have FUN doing it!

The Cooking Corner

~Blog Team
 

Thursday, September 27, 2018

Fried Shrimp | How to Fry Shrimp

Hello all!
     Fried Shrimp I feel is always a classic and very delicious Shrimp in general can be made so many different ways as well.  Frying it however is a lot easier than you would imagine.  We feel people may not know how to or think it's to difficult with the oil but check out this post below and we bet if you bring this to your next party it will be a hit!

The other thing is if you are worried about frying don't be!  Use good fresh oil and a deep pan.  Have a thermometer with you and don't let the oil get above 350.  Remember when frying foods will cool the oil down so watch for that too.  You don't want to cool or to hot of oil.  However the Copper pan Chef got and uses came with a fryer basket!  It works so well and he continues to fry with it!  These shrimp cooked so fast Chef says he can't make them fast enough before people eat them! Check out the information below for this recipe!

Serves: 1 Bag will serve about 6-8 (Depending how many like shrimp!)
Prep Time: 25 Minutes
Cook Time: 2-4 Minutes
Total Time:  About 30 Minutes

Ingredients:
1 Bag Uncooked, Pealed, Deveined Shrimp
2-3 Cups Flour
3 Eggs
2 Tablespoons Milk
2-3 Cups Panko Break Crumbs
Pinch of Salt
Pinch of Pepper
Tablespoon Garlic Powder
Tablespoon Paprika
2 Tablespoons grated Parm Cheese
Oil
Lemons
Cocktail Sauce

Directions:
Pick up some uncooked, pealed and deveined shrimp from the store.
If frozen place the shrimp in cold water and let thaw.
While thawing, prep.
In 3 different pans place the following.
Pan 1:  Flour, pinch of salt, Pepper, Garlic Powder, Paprika. Then mix around
Pan 2: Eggs, Milk.  Then mix around
Pan 3: Panko crumbs, pinch of salt, Pepper, Parm Cheese.  Then mix around.
Drain the shrimp when thawed and pat dry.
Dredge the shrimp in the flour and get a good coat.  You can use the tail to hold, works great.
Move them to the egg batter and again use the tail as a holder to keep your hands clean.
Move them to the Panko mixture and fully coat.
Place on a plate and do this over and over with the other shrimp.
Place the plate in the fridge so the crumbs and adhere to the shrimp.
Heat your oil to 350 Degrees.
Using a basket or by hand slowly place the shrimp in the oil and monitor the heat.  You don't want it above 350 or below 300.
They will only take a few minutes to cook because they are not frozen.  If frozen keep them in longer.
Once they look golden brown remove and let dry on a cooling rack, but not long.
Serve up fast and hot with a lemon and cocktail sauce!

Here they are!

They came out with the perfect crunch and remember shrimp don't take long to cook so only about 2 or 3 minutes in the fryer.  The team made this video and it was our first attempt.  The shrimp came out really well and tasted great.  Chef was nervous because he wasn't sure how they would taste or look but he did very well.  Below will be our video so be sure to see how Chef puts this all together.


We want to thank everyone again for stopping by!  This will make such an amazing appetizer!  Trust us!  Plus you can pick up a nice pan like Chef has to fry with!  He is using the Copper Pans you probably have seen.  It worked out so well and cleaned up even easier!  He has fried a lot since this video and it always does a great job.  Thank you all again and we do hope you try this out.

Remember,
Cooking should be FUN, have FUN doing it!

The Cooking Corner
~Blog Team  

Monday, September 10, 2018

White Castle Burgers

Hello all,

So we wanted to see if we could top the big bad White Castle Burgers!  We don't have a location near us so we had to buy them in our freezer section.  However Chef will admit he does like them from time to time.  The thin style has a great taste. So we wanted to see if the team could make them on our own!  Chef things he did okay, but he is always hard on himself.  The burgers came out a bit different however had a much better flavor.  They tasted more like a burger than the sliders we bought.  So below is how we tried to remake this classic slider.  We think you would enjoy this fun dinner so give it a try!

Prep Time: 15 Minutes
Cook Time: 15 Minutes
Total Time: 30 Minutes

Ingredients: 1 Lb Ground Beef (Chef used 90/10) 1 Egg (Not required) 3 Table Spoons Bread Crumbs (Not Required) 1 Chopped Onion Slider Roles (Chef Used King Hawaiian Roles)
Sharp Cheddar Cheese cut into small squares Butter Pinch of Salt 
Pinch of Pepper

Directions:
In a large bowl place the beef, bread crumbs, egg, salt & Pepper
Mix all them together.
Take out a small amount and either use a patter former or your hand to make very small thin patties.
*(Chef says you can also buy pre-made thin patties and cut them if you want.)
Cut the edges to make the square.
Put them in the fridge for a few minutes
Cook the onions in a pan over high heat.
Once the onions are almost done cook the burgers on a flat top.
Each burger will only take a few minutes per side.
Put some putter down and toast the one sides of the roles when the burgers are just about done.
The rolls will only take a few seconds on a hot surface to brown so be careful.
Remove the rolls and place the cooked onions and cheese. To heat the cheese place a small tablespoon of water on the surface and a lit on top. The steam will melt the cheese.
Remove and plate up!

Here they are! 

We did a taste test and we did like ours better, but in honestly we really did.  Our burgers were not as thin as the Store Bought ones but the taste was amazing and we didn't skimp on the onions or cheese either!  There are some short cuts we could have done to make them easier and next time the team might.  Below is the video and how we put this together so be sure to check it out!


We do thank everyone for checking out our video and hope you do try this.  Making your own sliders is fun and isn't hard at all.  You can also do a taste test like we did and compare!  We hope everyone enjoyed this blog post and checks our our other ones we put out there.

Thank you all again and remember

Cooking should be FUN, have FUN doing it!

The Cooking Corner

~Blog Team

Monday, August 20, 2018

Sloppy Dip

Hey all!
     We wanted to make a video on an amazing appetizer!  Chef John from food wishes made this video and we decided to recreate it!  We will put Chef John's info below, fun fact he grew up in a town near our's!  This dip actually came out with so much flavor and was so easy to make!  It was a hit at the party and could even be a meal if you wanted.

The prep and cooking part was the easiest part, the time it took to simmer was the part that was long.  You want this to simmer for about 40 Minutes on low to really soften the meat and make it just fall part when you eat it.  A low slow simmer is always better than a faster higher heat simmer.  You can also feel free to add or subtract any of the ingredients you see to create your own dish.  We think you will really enjoy this so please below check out the rest of the blog!

Serves: 8-10
Prep Time: 20 Minutes
Cook Time: 50 Minutes
Total Time: 1 Hour 10 Minutes

Ingredients:
Makes 12 portions of Sloppy Dip: 
2 pound extra lean ground beef
1 onion, diced
2 diced green bell pepper (1 cup)
4 cloves garlic, minced
2 teaspoons kosher salt, or to taste
1 teaspoon ground black pepper
3 tablespoons all-purpose flour
2 tablespoons brown sugar
cayenne to taste
1 cup ketchup
2 cups chicken broth or water
1 tablespoon Dijon mustard
1 teaspoon Worcestershire sauce
1 cup shredded cheddar cheese, divided

Directions:
In a deep pot start with your ground beef.
Add Chopped Onions, Peppers, Garlic, Salt, Pepper, Flour, Brow Sugar, and Cayenne Pepper
Mix all these dry ingredients over medium high heat and let cook.  Should take about 10-15 minutes
Once the meat is fully brown add your wet ingredients, Ketchup, Chicken Broth, Dijon Mustard, and Worcestershire Sauce. 
Turn down the stove to low and let simmer for about 40 minutes.
Stir every so often to mix up the dip and move around the flavor.
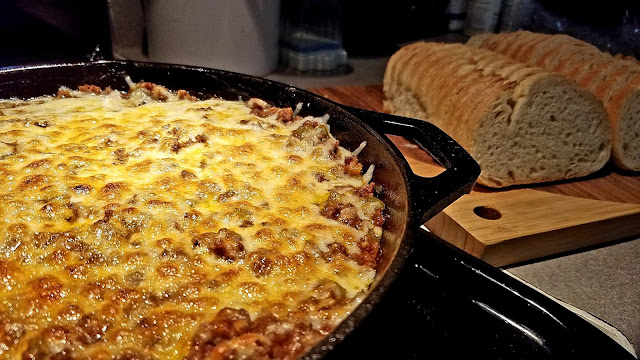
Once it is to a thickness you want, remove and put in a cast iron skillet.  (Or oven safe pan)
Sprinkle 1/2 Cup of shredded Cheddar Cheese on top and then mix into the dip.
Sprinkle the rest of the cheese on top making a light coat.
Turn your oven to broil and let cook just a few minutes to melt the cheese.  It will have a nice golden brown crust to it.

Here it is!

Chef really enjoyed making this and the team loved eating it.  Mixing and making this dish was so simple and although it takes some time to let simmer it was so worth it.  Plus this is one of those apps nobody would expect to see coming!  You will shock all your guest at the party on this one!  Make sure to see the video below to see how Chef made this and follow along!  


Thank you all again for joining us.  We have put out some fun appetizers but this one really was awesome!  Plus we are big fans of Chef John so it was really cool recreating one of his dishes.  Be sure to check out other video's you find interesting on our site we think you will enjoy those too!

Thank you again for spending time with us.

Remember cooking should be FUN, have FUN doing it!

The Cooking Corner
~Blog Team
Chef John's Info:

YouTube
https://www.youtube.com/user/foodwishes

Blog:
https://foodwishes.blogspot.com/

Thursday, August 9, 2018

Cheesy Ranch Chicken Tenders

Hey all!
Everyone loves homemade dishes right? How about some homemade chicken tenders! Better yet cheesy crispy ones! Chicken tenders are so simple to make why are we buying them?! Well I know because someone else making them is just that much easier. Yes but if you make them yourselves you will have the much more love for them! We baked and fried these and well the fried ones did come out a bit better yes. However the baked ones were really good. So down below is a great recipe to make your own homemade cheesy ranch chicken tenders!

Prep Time: 2 1/2 (Hours Up to a day)
Cook Time: 10 Minutes


Serves: How many you cook up.

Ingredients:
7-14 Chicken Tenderloin Strips
2 Cups Buttermilk (Enough to coat the chicken) 1 Packet of Powder Ranch dressing Crushed cheddar crackers or chips into crumbs Oil for frying Ranch or other dipping sauce you like

Directions:
In a large bowl place your Chicken Tenderloin Strips
Cover fully with Buttermilk
Then add 1 package dry ranch dressing
Mix well and refrigerate for 2 hours, up to 1 full day3
Crush up some cheese crackers, or chips. Something very cheesy that makes small crubs
Place one piece of chicken in the crushed cheesy crumbs and coat well
For the ones you will fry put them in the fridge for about 15 minutes

Oven Baked:
Heat your oven to 450 Degrees.
Place the chicken on a cooking sheet and in your oven
After 10 minutes flip over and put back in
After another 10 they should be done, however always check. Internal temp should be 165.

Frying:
Heat up your frying oil to 350 Degrees
Take your chicken out of the fridge
Place one piece in the oil slowly at a time
Do not crowd the oil
Check the temp you want it around 320 for cooking
Cook for about 6 minutes or until they float
Again they should be 165 degrees.

Take them out and serve up with your favorite dipping sauce!

Here is how ours turned out!

They both had a great flavor, the fired chicken was a bit darker and held together better but it is always good to try both ways! This was so much fun and Chef even took the leftovers and froze them for later. It was pretty cool to try this out because how often do we order these but now you can so make them!
Check our our video below on how to make them. We think you will find it very easy to follow.


Thank you again for joining us and we hope you try this dish out.  They had a great flavor and had a great crispy outside and a juicy inside.  Try some other ideas or seasonings when making this dish too.  You might find some others that work very well!  Thank you all again for joining us and we do hope you enjoy.

Remember,
Cooking should be FUN, have FUN doing it!

The Cooking Corner

~Blog Team


Thursday, July 12, 2018

Maple Sausage Corndogs

What up Dog!

How about a fun Corndog!  These fun fried treats make a great breakfast or snack!  They are actually really easy to make and don't take long at all.  They have a nice crispy fried outside shell with a juicy inside sausage middle.  You can make so many different kinds of corndogs so why not try a breakfast one!  Chef had fun making these and did it all on his first try.  He said if you follow the ingredients and directions you can too!  Why not make something fun for the family to come down to besides the traditional breakfast ideas most see!  Spice it up with a breakfast corndog! 

Serves: 14
Prep Time: 8 Minutes
Cook Time: 2 Minutes
Total Time: 10 Minutes 

Ingredients: 2 Tablespoons Oil (For cooking Sausage) Oil for frying 14 Sausage Links (Pre-Cooked or not, we used Maple flavor) 2 Cups Flour 1 TPS Salt 1 TSP Baking Powder 1 TSP Baking Soda 3 TBSP Sugar
3 TBSP Bacon Bits (Use real bacon pieces) 1 Cup Milk 2 Eggs 1/4 Cup Butter Powder Sugar Syrup

Directions:
Slowly heat up your frying oil to 350. Heat the oil slowly no need to rush.
While the oil's heating in a pan cook your sausage, or if they are precooked just heat them up.
If they are not precooked make sure you add a bit of oil or water to the pan so they don't stick.
Once cooked remove and pat dry with a paper towel and let them cool for a bit.
Place a candy stick or Popsicle stick then up the sausage. About 1/2 way or 3/4 way up.
Place aside and start the batter.
Place a sifter over a large bowl and add the following to it.
Flour, salt, Baking Powder, Baking Soda, and Sugar.
Then move the sifter and sift the ingredients into the bowl. This will mix them for you.
Make a well using your hands and add the rest of the ingredients.
Milk, Eggs, and Butter.
Form a good batter.
Once mixed add the Bacon pieces and stir those in.
Pour some of the batter into a large glass almost all the way to the top.
Dip the sausage into making sure the batter coats it completely.
Pull out and slowly place in the oil moving it around until you drop it in.
Do this a few more times and then move the corndogs around making sure all the sides get cooked.
This will take a few minutes tops.
Once they are golden brow take them out and put them on a grated drying rack to drain and cool a bit.
Plate them up and sprinkle some powdered sugar on top for garnish.
Serve up with some syrup for dipping!
Enjoy!


Here they are!

We think you really will like this and the directions and ingredients are very easy to use, work with and follow! Chef said this was a lot easier than he planned and would like to do more down the road. He would love to try different kinds of corndogs. Be sure to check out our video to see how we made these. It also helps when you are making them your selves.


We again think you will enjoy this and make sure to give it a try!  It really was a fun dish.  Thanks for joining us on this post and we hope you have been trying out some of our ideas.  We have been trying to put out fun and creative things for you and your family to enjoy!  We here at have been loving some of the things Chef makes!  

Thanks again and remember,  Cooking should be FUN, have FUN doing it!

The Cooking Corner
~Blog Team